Learn · Filet crochet basics
Adding and Removing Meshes at the Edges
Shaped filet, like a pointed hanging, a mask or the ears of a cat, comes from rows that grow or shrink at the edges. There are only four situations, fewer or more meshes at the start or at the end of a row, and each has its own little move. Here they are, drawn out stitch by stitch.
The short version
- Compare each row with the row below at both ends: that tells you what to do.
- Fewer at the start: slip stitch across them, 2 sl st for each mesh, then ch 3.
- Fewer at the end: stop where the chart stops and turn.
- One more at an edge: work three stitches into the corner stitch.
- Several more: at the start ch 2k + 2 for k meshes; at the end 2 extended dc for each mesh.
1Spot the shaping on the chart
Before you start a row, compare it with the row below at both ends. Where the new row reaches further out, you add meshes; where it stops short, you remove them. Keep in mind which end is the start: it is the side with the row number, on the right for odd rows if you crochet right-handed.
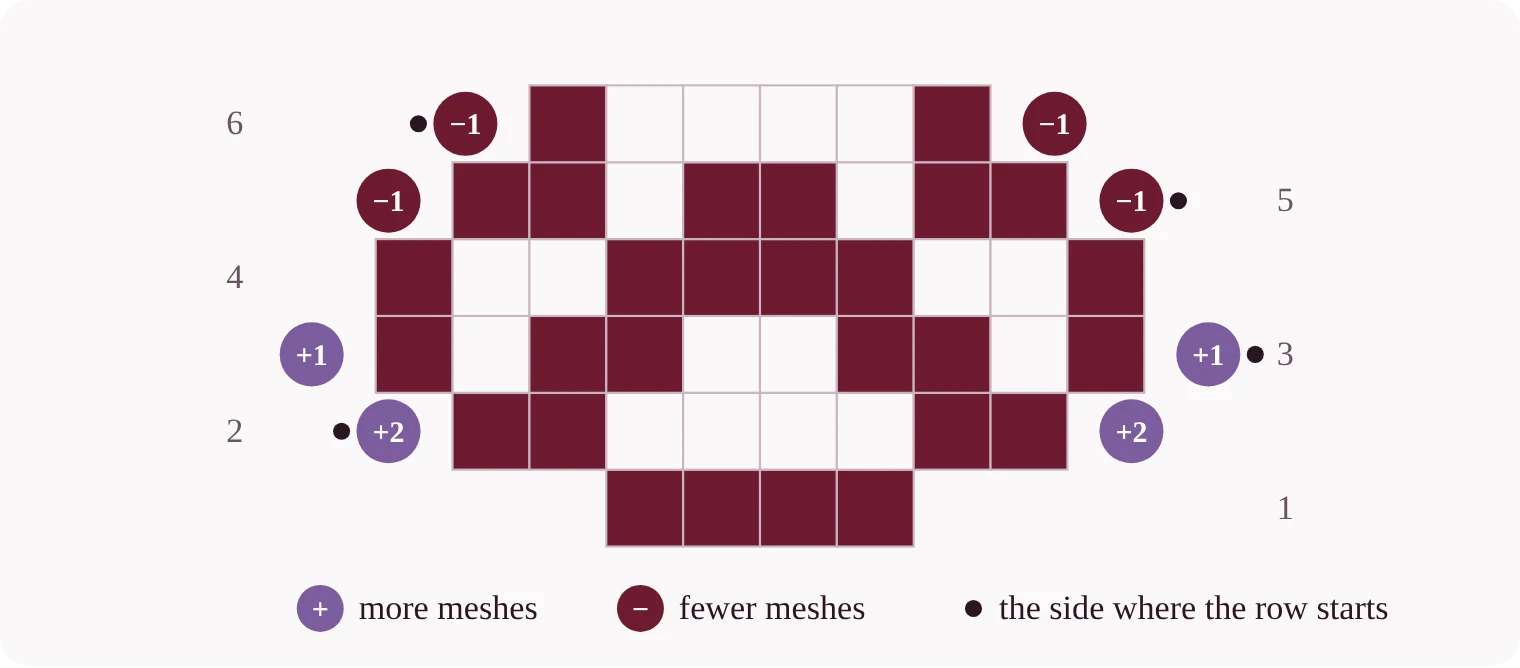
That gives four situations, fewer or more meshes, at the start or at the end of a row, and the rest of this guide takes them one at a time. If the chart itself is new to you, begin with How to Read a Filet Crochet Chart.
2Fewer meshes at the start of a row
At the start of a row you are standing on the edge stitch of the row below, and the meshes you want to lose are right in front of you. Walk across them with slip stitches, which add almost no height:
- Turn, but don’t make the usual ch 3.
- Slip stitch across the meshes that drop out: 2 sl st for each mesh, one in each stitch.
- You are now on top of the dc that becomes the new edge. Ch 3 (it counts as the first dc) and carry on along the row.
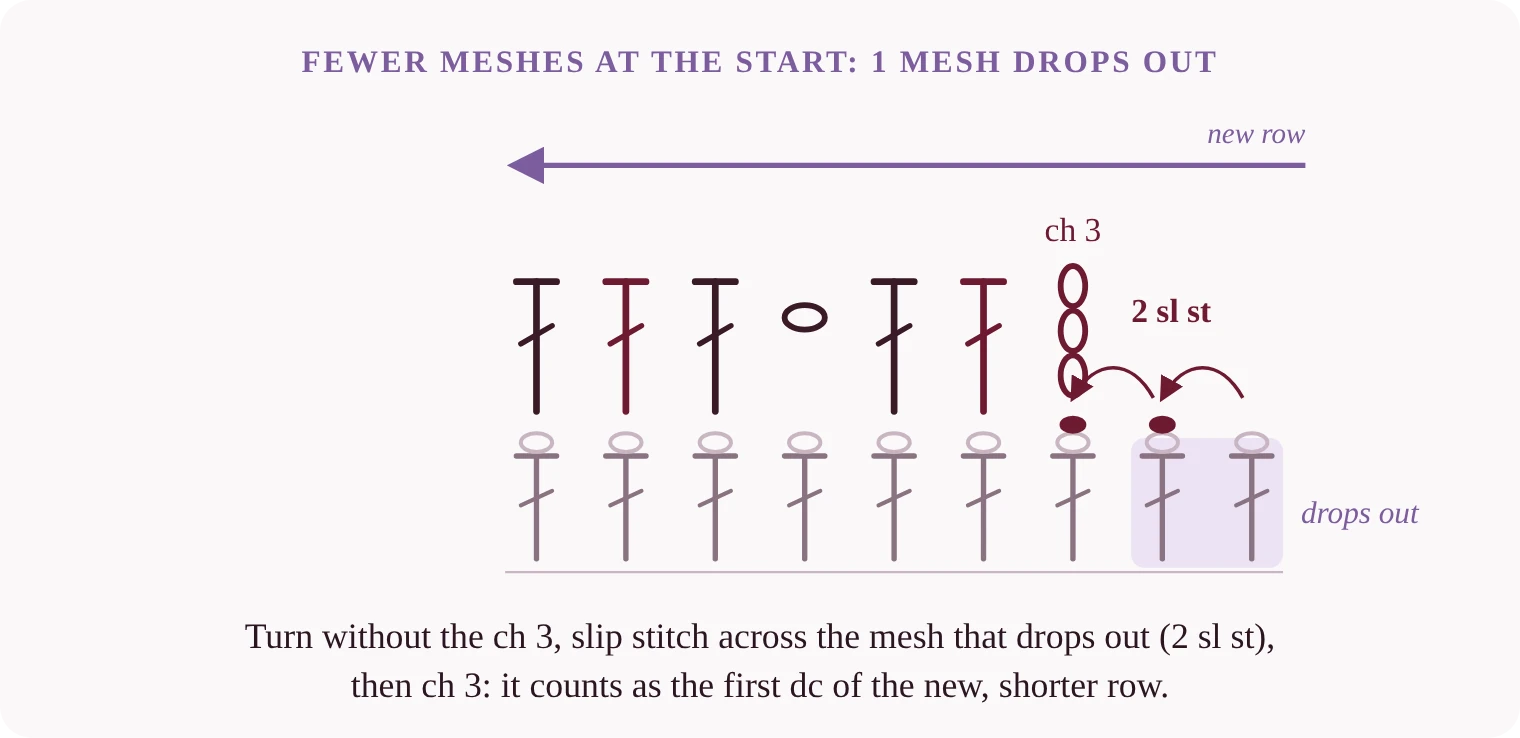
In a pattern it reads like this: “turn, sl st across 2 meshes (4 sl st), ch 3, 8 filled…”.
3Fewer meshes at the end of a row
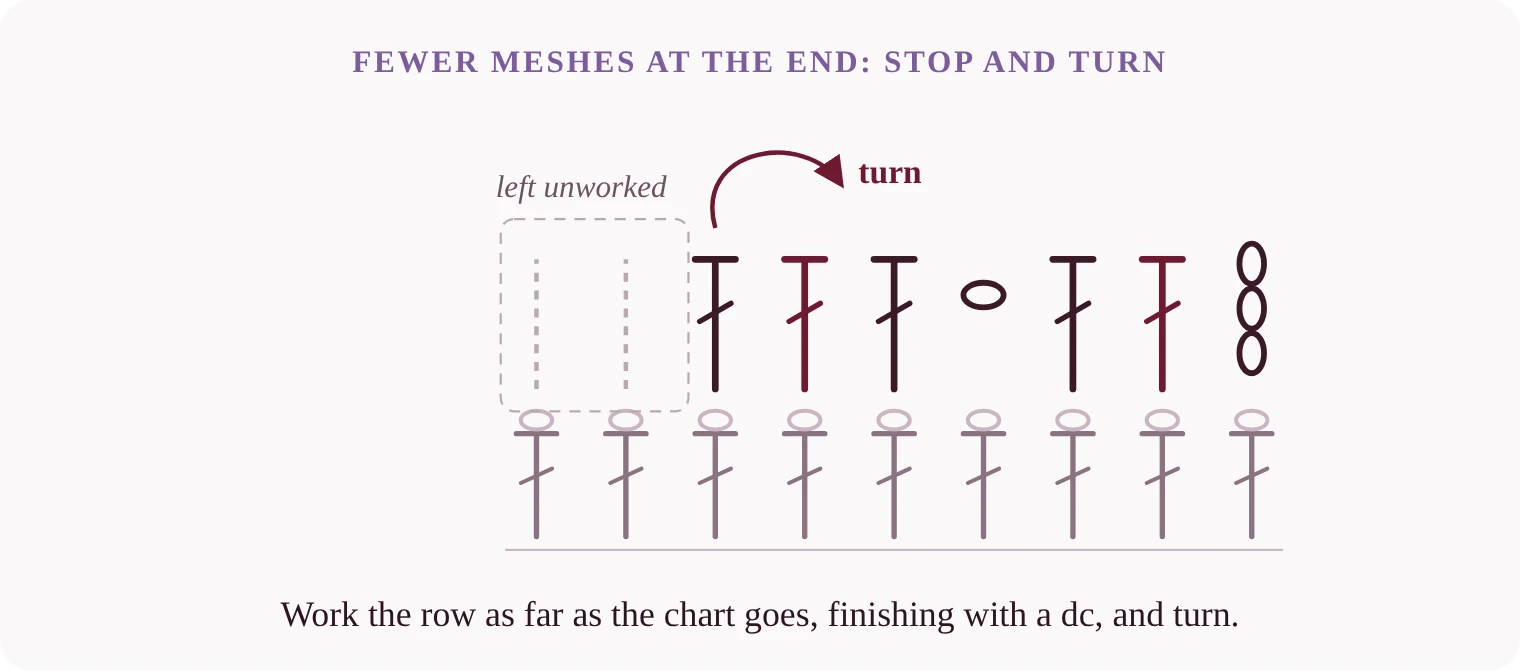
This one is the easiest. Crochet the row only as far as the chart goes, finishing with the dc that closes the last mesh, and turn. The meshes of the row below that you didn’t reach simply stay unworked.
4One more mesh at an edge: into the corner
When a chart grows by one mesh at a time, as along a straight slanted edge, you can make the new mesh in the edge stitch itself, so that three stitches meet in the corner:
- At the start, filled: ch 3, 2 dc in the same stitch.
- At the start, open: ch 4 (a dc plus a ch 1), dc in the same stitch.
- At the end, filled: 2 more dc in the same place as the last dc.
- At the end, open: ch 1, dc in the same place as the last dc.
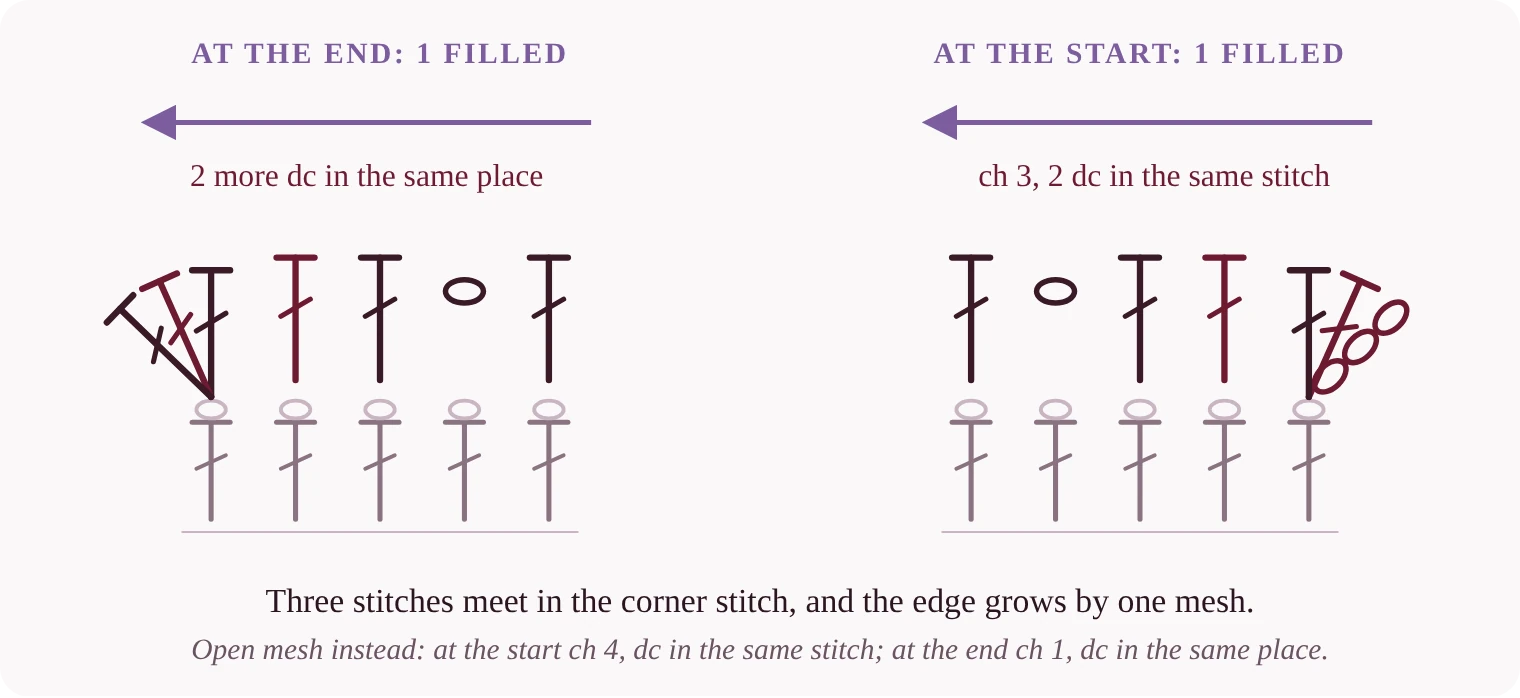
The point of our Epitaphs · Hell is empty hanging grows like this, one mesh at each edge in every row.
5Several more meshes at the start: a chain
To add more than one mesh at the start of a row, or whenever your pattern works it this way, make a chain to hold the new meshes:
- Turn and ch 2k + 2, where k is the number of new meshes.
- The first 3 ch from the hook are the new edge dc.
- Work the new meshes back along the chain: for a filled mesh, dc in each of the next 2 ch; for an open mesh, ch 1, skip 1 ch, dc in the next ch.
- Work the last dc of the new meshes into the dc the chain comes from, and carry on along the row.
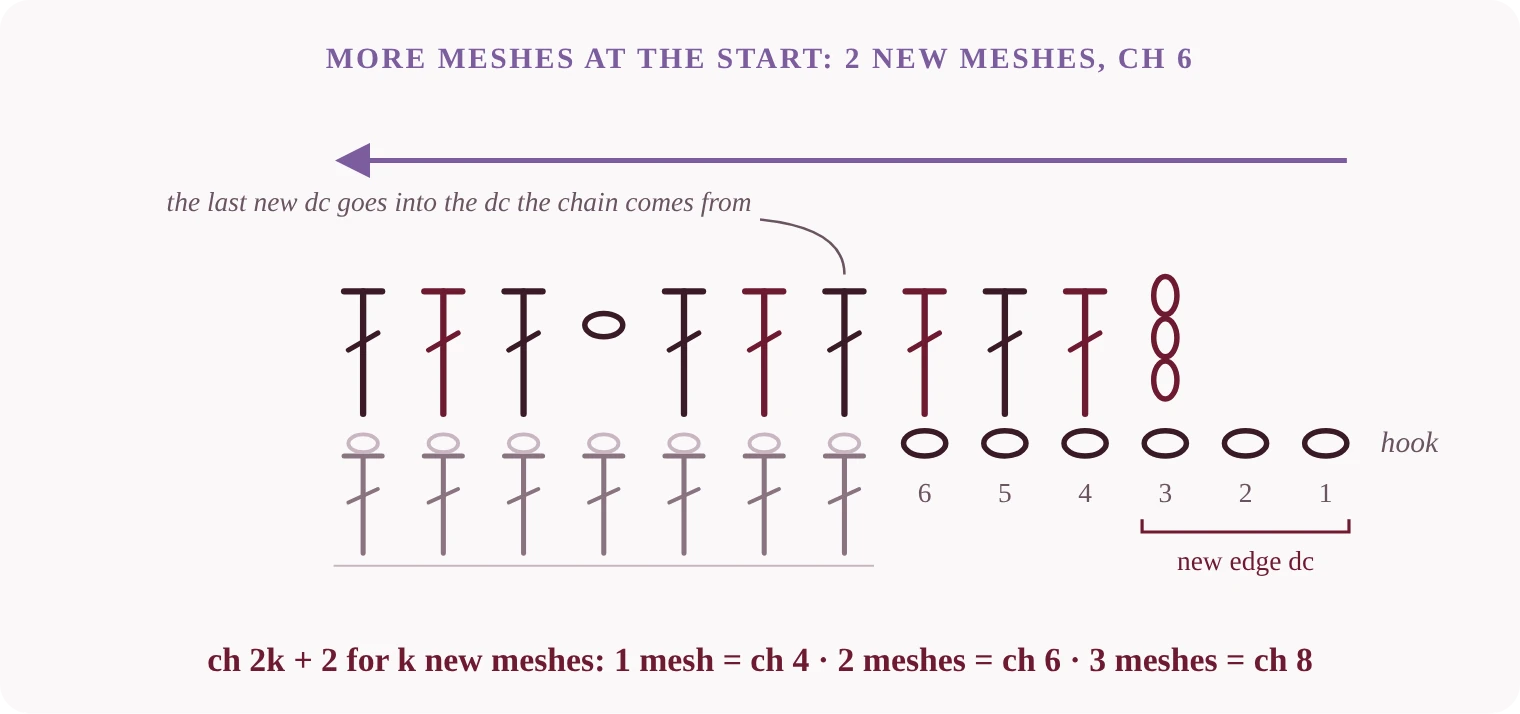
Why 2k + 2? Each new mesh needs 2 chains and the new edge dc needs 3, but you save one, because the last new mesh closes on the dc that is already there: 2k + 3 − 1.
6Several more meshes at the end: extended double crochets
At the end of a row there is no chain to work into, so each new stitch builds its own. An extended double crochet (edc) has a little chain at its base, and the next one stands on it:
- After the last dc of the row, work 2 edc for each new mesh, with no extra thread.
- The first goes into the base of the last dc, where it sits on the row below.
- Each next one goes into the little base chain of the one before.
Extended dc: yo, insert the hook, pull up a loop, yo and pull through 1 loop (this makes the base chain), then [yo, pull through 2 loops] twice.
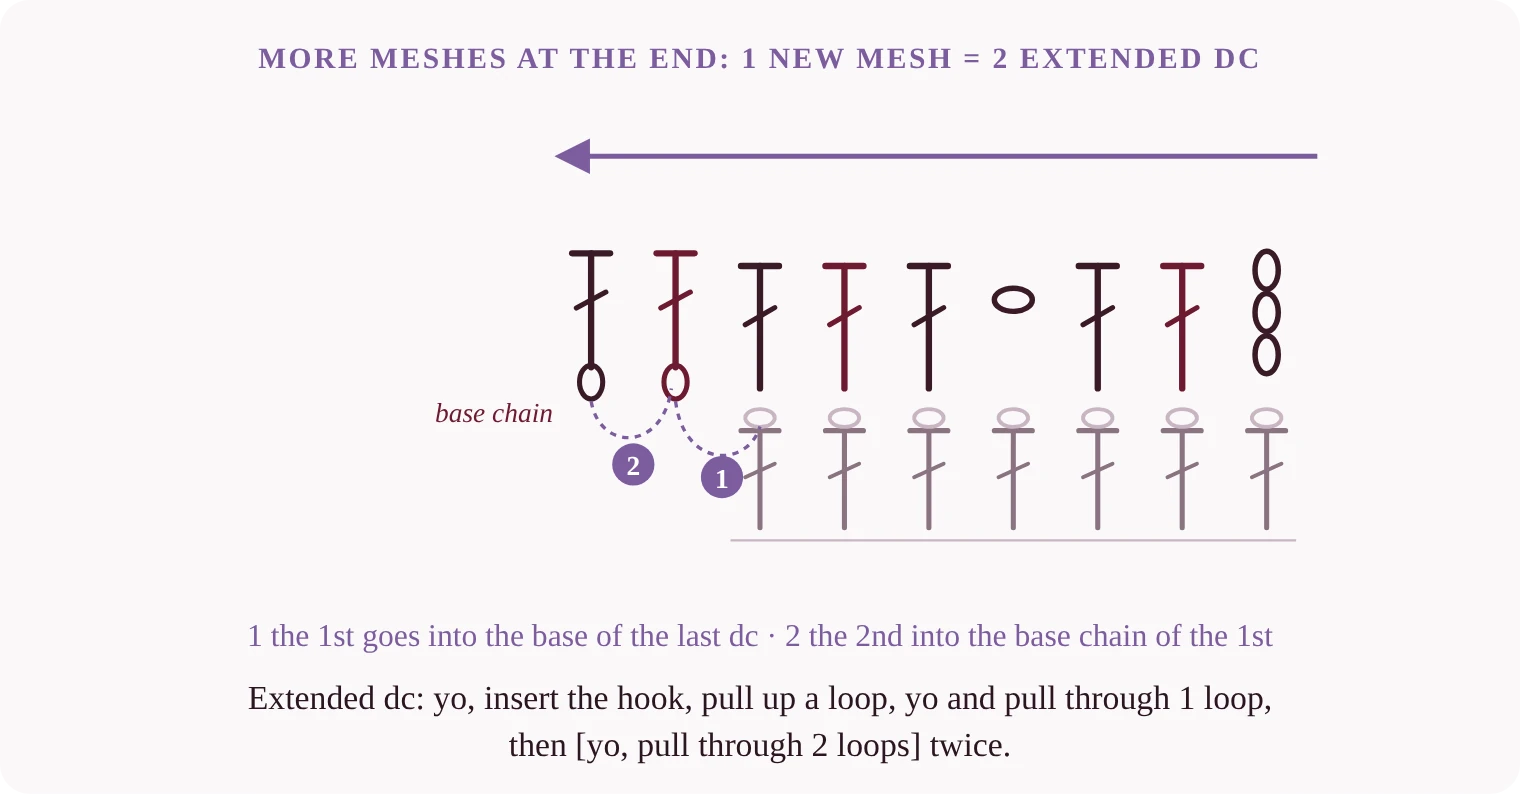
Meshes added with extended dc are always filled, and our charts are drawn to match. In UK terms the extended dc is an extended treble.
7Rows in parts
Sometimes a chart splits at the top, into the ears of a cat or the points of a web, and one row becomes several separate pieces. Work the parts in the order your pattern gives. Where it says “join the thread”, start that part with a new thread, and fasten off each part when it ends.
8Check your count
After a shaped row, count the meshes against the chart. A row of N meshes has 2N + 1 stitches, counting the ch 3 at the start as one, so a quick count of the stitches tells you straight away whether a mesh went missing.
9Practise the shaping
Each of these patterns uses the moves from this guide, and spells out every row in words.
Epitaphs · Hell is empty
Shakespeare’s line in blackletter on a pointed hanging, with an hourglass on moth wings and a tassel.
Aranea · Spooky mask
A spider web across the whole face, with no eye holes: you look out through the lace. Bookmark included.
Mau · Spooky mask
A black cat with a crown of spikes and a lace grin from ear to ear. Bookmark included.
10Questions
How do you increase in filet crochet?
By one mesh: work three stitches into the edge stitch, in the corner. By several meshes: at the start of a row chain 2k + 2 and work the new meshes into the chain; at the end work 2 extended double crochets for each new mesh.
How do you decrease in filet crochet?
At the start of a row, slip stitch across the meshes that drop out (2 sl st for each mesh), then ch 3. At the end, stop where the chart stops and turn.
Why 2 slip stitches for each mesh?
Each mesh is two stitches wide, a middle stitch and a dc, so two slip stitches take you from one edge dc to the next.
What is an extended double crochet?
A double crochet with a little chain at its base: yo, insert the hook, pull up a loop, yo and pull through 1 loop, then [yo, pull through 2 loops] twice. In UK terms it is an extended treble.
Can I add an open mesh at the end of a row?
One at a time, yes: ch 1, dc in the same place as the last dc. Meshes added with extended double crochets are always filled.